Panadapter Controls
The panadapter is the main display: the FFT spectrum on top and the scrolling waterfall below. AetherSDR can show up to 8 panadapters (as many as the connected radio allows), stacked in the main window or popped out into their own windows.
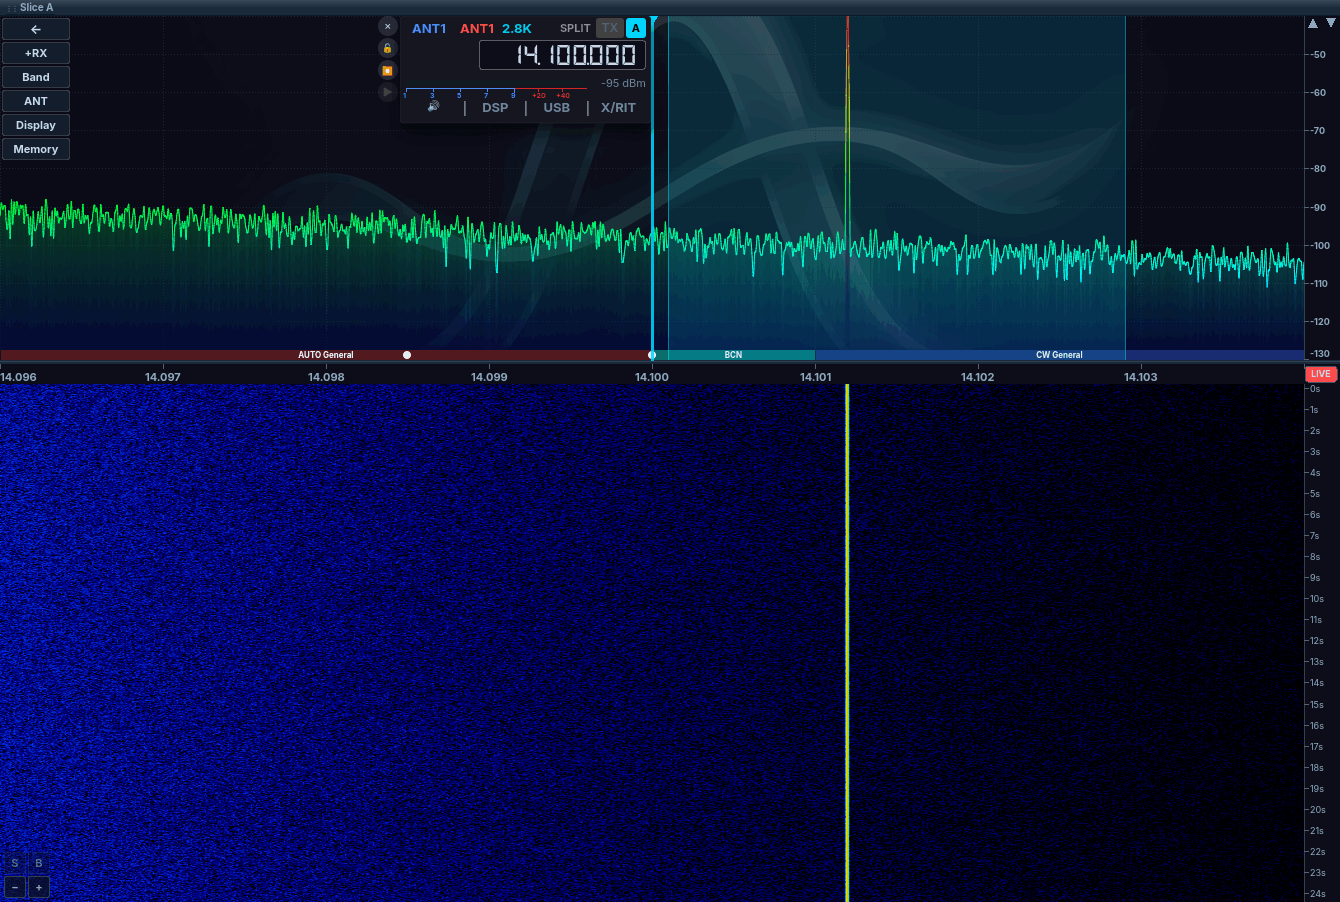
A panadapter with its waterfall, the slice A VFO flag and the overlay menu down the left edge.
Using the panadapter
Mouse controls
| Action | Spectrum / waterfall | Frequency scale | dBm scale | Waterfall time scale |
|---|---|---|---|---|
| Drag | Pan the display | Zoom the span | Shift the reference level | — |
| Ctrl+drag (Cmd on macOS) | — | — | Zoom the dB span (bottom stays anchored) | Change the waterfall scroll rate |
| Double-click | Tune to that frequency | — | — | — |
| Scroll wheel | Tune by the step size | — | — | — |
| Ctrl+scroll wheel | Zoom the span around the frequency under the cursor | — | — | — |
| Right-click | Context menu (below) | — | — | — |
- View → Single-Click to Tune (off by default) makes a single click tune instead of a double-click.
- Clicking an empty part of a panadapter that has no slice on it adds a new slice there.
- Dragging a slice to the edge of the pan keeps panning the display.
- On a trackpad, vertical scrolling tunes, sideways swipes are ignored, and pinch-to-zoom changes the span where the system delivers a zoom gesture.
- If the wheel tunes the wrong way for your mouse or trackball, turn on Radio Setup → Appearance & Behavior → Reverse mouse-wheel tuning direction.
- Dragging any slider shows its value in a small popup.
Right-click menu
Right-click the spectrum or waterfall:
| Item | What it does |
|---|---|
| Add Slice at X MHz | Opens a new slice at the clicked frequency. |
| Add TNF at X MHz | Places a tracking notch. See TNF (Tracking Notch Filters). |
| Add Spot at X MHz… | Adds your own spot. |
| Close Slice X | Closes the slice under the pointer. |
| Center Lock | Keeps this pan centred on a slice (below). |
| Link Slice ▸ | Links two slices so tuning one retunes the other. See Multi-Slice Operation. |
| Waterfall Time Markers ▸ | Off, 15 seconds, 30 seconds, 1, 5, 10 or 15 minutes (below). |
| Show Tune Guides | Checkable display option. |
| Extended Frequency Line | Extends each slice's frequency line down through the waterfall. |
| Extended Passband | Extends each slice's passband shading down through the waterfall. |
| Extended TNF | Extends each notch down through the waterfall. |
| 3D Slice Shadow | In 3D mode, draws slice shadows on the 3D surface. |
| ↗ Pop out / ↩ Dock | Moves this panadapter into its own window, or back. |
Right-click a TNF marker for Remove TNF, Width ▸, Depth ▸, Extended TNF and Make Permanent / Make Temporary. Right-click a spot you added for Remove Spot.
Center Lock
Center Lock keeps a panadapter centred on one slice as it tunes, independently for each pan.
- With one slice on the pan, the menu item reads Center Lock Slice A (checkable).
- With several slices, a Center Lock submenu lists them, active slice first.
- The lock survives band changes. When it is released, the pan shows "Center Lock released".
- It can also be toggled from a keyboard shortcut (Center Lock Active Slice), MIDI, FlexControl and RC-28.
Upgrading from an older version: Center Lock replaces the title-bar Pan Lock button.
Waterfall Time Markers
Thin lines across the waterfall at clock boundaries, each labelled with its UTC time. They stay pinned to their rows as the waterfall scrolls, pauses or resizes. Off by default; the choice is remembered per panadapter.
FFT/waterfall split
Drag the divider between the spectrum and the waterfall to resize them. The split is remembered.
dBm scale
- Drag the scale up or down to shift the reference level.
- Ctrl+drag (Cmd+drag on macOS) to zoom the dB span; the bottom stays anchored.
- Click the ▲ / ▼ arrows at the top to step the reference level by 10 dB.
- Labels use 1-2-5 steps.
3D Stacked Trace
Display → 3D VIEW → Spectrum: 3D Stacked Trace turns the spectrum into a perspective surface built from recent traces receding into the distance. Ridge height is measured from the noise floor and coloured from floor to peak, and single-frame impulse bursts are rejected. The waterfall, scales and every overlay (spots, memories, markers, band plan) still draw as normal, and the dBm scale stays on the right as a full-height axis. It works on KiwiSDR sources too, and uses the GPU where available (see GPU Rendering).
Band plan overlay
The strip along the bottom of the spectrum shows band segments, coloured by use. In the ARRL (US) plan, for example: blue for CW, red for data, orange for phone/SSB, cyan for beacons, purple for satellite, green for weak-signal SSB, and yellow for mixed or experimental segments. Dots mark spot frequencies (FT8, WSPR, QRP calling and so on); hover for a tooltip.
View → Band Plan sets:
- Size: Off, Small, Medium, Large or Huge.
- Show Spots: turns the spot dots on or off.
- Region: ARRL (US), IARU Region 1, IARU Region 2, IARU Region 3, RAC (Canada) or SSA (Sweden).
The ARRL and RAC plans mark licence classes by brightness. The ARRL plan's 60 m band follows the FCC order effective 13 February 2026. The selected plan is remembered.
Off-screen VFO indicator
When a slice is outside the visible span, an indicator at the edge shows its letter, TX status, a chevron and its frequency. Click it once to make that slice active and bring it into view. Right-click it for the slice menu.
Mini-Pan
Mini-Pan is a narrow, K4-style spectrum of the active slice in an applet (button MINI, off by default). It shows a ±5 kHz window by default, or ±10 kHz; right-click it to choose. The window is centred on the slice's passband (on SSB that is offset from the carrier); a hairline and readout mark the carrier.
It re-uses the main panadapter's data, so it uses no extra radio panadapter or slice, and its detail follows the main pan's zoom. It is an applet rather than a menu item so it is available in Minimal Mode; float it from its title bar to keep it on top of a logging program.
Multiple and detached panadapters
- Tools → Add Panadapter... or the +PAN icon in the status bar opens a layout picker and adds a pan if the radio has room.
- Right-click → ↗ Pop out moves a pan into its own window; ↩ Dock puts it back.
- Pan layouts, including floating pans, are restored when you reconnect.
- With the Workspace Canvas on, Import pop-outs onto canvas places floating pans on the canvas.
Panadapter messages
Status cards appear over the spectrum for things like "Center Lock released", a renderer problem, or KiwiSDR connection state. KiwiSDR status cards can be collapsed to a small pill but not closed.
Status bar
The status bar at the bottom of the window starts with the band-stack indicator and +PAN (add a panadapter), followed by indicators such as TNF, CWX, ASR, DVK and FDX (each only on radios and builds that support it). Click an indicator to toggle it.
View → FPS Meters (Ctrl+F) adds spectrum and waterfall frame-rate readouts to each pan.
Using the applet panel
The applet panel holds the radio controls (S-Meter, RX, TX, Phone, P/CW, EQ and many more).
Showing, hiding and moving the panel
Use the icons at the right of the title bar:
- Dock left / Dock right — put the panel on that side of the panadapters. Clicking the side it is already on hides it.
- Pop out — float the panel in its own window (also Ctrl+Shift+S). Popped-out applets have a pin for always-on-top.
The button bar
The top row of the panel holds five favourite buttons (by default VU, PWR, RX, TX and P/CW) and a ▼/▲ drawer button that shows the rest. Right-click the bar (or the drawer button) and choose Customize Button Bar to pick your favourites and hide buttons you don't use; the first five active entries fill the bar and the rest go in the drawer. Hiding a button also closes its applet. Buttons for accessories you don't have (tuner, amplifier, Antenna Genius and so on) appear only when that hardware is present.
Reordering applets
Drag an applet by its title bar (⋮⋮ grip) to reorder it. The order is remembered. View → Reset Applet Order restores the default.
Reference
Screen layout
- FFT spectrum — real-time signal strength across the displayed span
- Frequency scale — between spectrum and waterfall, in MHz
- Waterfall — scrolling time-versus-frequency history
- dBm scale — right edge of the spectrum
- Time scale — right edge of the waterfall
- Band plan — coloured strip along the bottom of the spectrum
- Overlay menu — the button column at the left: +RX, +TNF, Band, ANT, Display, Memory, DAX (the DAX flyout holds the IQ Ch selector and the WFM demodulator, and only appears on radios with DAX)
Display panel
Click Display in the overlay menu. The panel is divided into sections and scrolls when the window is short. Settings apply to the panadapter you opened it from.
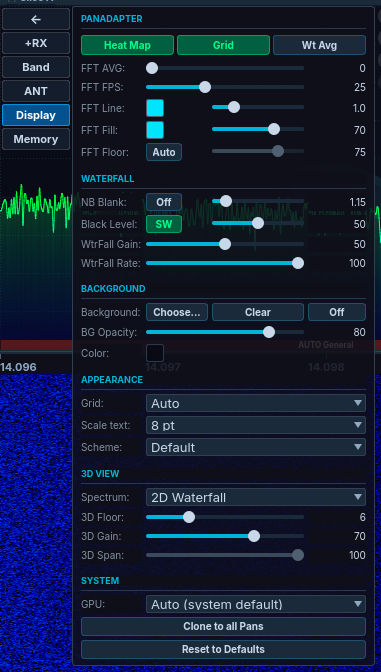
The Display panel, opened from the Display button on the panadapter overlay menu.
PANADAPTER
| Control | Range / default | What it does |
|---|---|---|
| Heat Map | On by default | Colours the spectrum trace by signal strength instead of one colour. |
| Grid | On by default | Frequency and dB grid lines. |
| Wt Avg | Off by default | Weighted averaging that favours recent frames. |
| FFT AVG | 0–100 | Frame averaging. Higher is smoother but slower to react; 0 is unaveraged. |
| FFT FPS | 5–60, default 25 | Spectrum frame rate. |
| FFT Line | Off–5.0 px, default 1.0 px | Trace thickness, with its own colour button. |
| FFT Fill | 0–100, default 70 | Fill opacity under the trace, with its own colour button. |
| FFT Floor + Auto | 1–99, default 75 | With Auto on, the dBm scale follows the noise floor and keeps it at this height (% from top). Off by default. |
WATERFALL
| Control | Range / default | What it does |
|---|---|---|
| NB Blank + Off/On | 5–95, default 15 | Suppresses impulse-noise stripes in the waterfall. Higher values blank less. |
| Black Level + Off / SW / HW | 0–100, default 50 | Waterfall black point. The button cycles automatic black level: SW estimates the noise floor in AetherSDR and the slider sets the offset from it; HW uses the radio's own level (FlexRadio only; other radios cycle Off ↔ SW); Off is manual. |
| WtrFall Gain | 0–100, default 50 | Waterfall colour gain. |
| WtrFall Rate | 1–100, default 100 | Scroll speed: 1 is slowest, 100 fastest. |
BACKGROUND
| Control | What it does |
|---|---|
| Background: Choose… | Pick a background image. The picker can show small icons or thumbnails. |
| Clear | Back to the default logo background. |
| Off | No background image. |
| BG Opacity | 0–100, default 80. |
| Color | Solid colour painted beneath the image. |
APPEARANCE
| Control | What it does |
|---|---|
| Grid | Frequency grid spacing (Auto adapts to the span). |
| Scale text | Size of the frequency-scale labels. |
| Scheme | Waterfall palette: Default, Grayscale, Blue-Green, Fire, Plasma, Purple, Glacier. Changing it recolours the waterfall already on screen, including scrollback. |
3D VIEW
| Control | Range / default | What it does |
|---|---|---|
| Spectrum | 2D Waterfall / 3D Stacked Trace | Switches to the 3D view (see 3D Stacked Trace). |
| 3D Floor | 0–24, default 6 | How far below the noise floor the surface starts. |
| 3D Gain | 0–100, default 70 | Ridge height. |
| 3D Span | 0–100, default 100 | How far the nearest rows overhang the plot edges. 100 fills edge to edge; 0 gives a narrowing trapezoid. |
SYSTEM
| Control | What it does |
|---|---|
| GPU: | Which graphics adapter draws the spectrum. Only shown on computers with more than one GPU; takes effect after a restart ("Restart to apply"). See GPU Rendering. |
| Clone to all Pans | Copies every Display setting from this pan to all other open pans: colours, fill, scheme, floor, 3D settings, background, and the radio-side values (FFT AVG, FPS, weighted average, waterfall rate, gain, black level). |
| Reset to Defaults | Resets this pan's display settings, including turning the grid back on and the line width to 1.0 px. |
Known issues
- Strong signals can show flat-topped, clipped peaks on the spectrum (#5685).
- With FFT Floor Auto off, the reference level can jump on its own when you tune to another frequency (#5525).
- After switching profiles several times, FFT Floor Auto can stay highlighted but stop following the noise floor until you turn it off and on (#3186).
- At a fractional UI scale (for example 85 %), mouse-wheel tuning can leave a stale, doubled strip along the top of the panadapter for about 15 seconds (#6270).
- With Frameless Window off, a popped-out panadapter's window title shows raw markup such as
Slice A<sub>1</sub>(#6274). - The S-Meter applet can't be dragged to a new place in the applet panel (#4347).
Troubleshooting
Clicking the spectrum doesn't tune
Tuning takes a double-click by default.
- Double-click the frequency you want.
- To tune with one click, turn on View → Single-Click to Tune.
The mouse wheel tunes the wrong way
Some mice and trackballs scroll the opposite way.
- Open Settings → Radio Setup... → Appearance & Behavior.
- Turn on Reverse mouse-wheel tuning direction.
The spectrum is drawn too low or too high
The reference level or dB span is set for a different band or signal level.
- Drag the dBm scale up or down, or click its ▲ / ▼ arrows to step it 10 dB.
- Or open Display and turn on Auto next to FFT Floor, so the scale follows the noise floor.
Impulse noise leaves stripes across the waterfall
Waterfall noise blanking is off or set too high.
- Open Display in the overlay menu.
- Turn on NB Blank under WATERFALL and adjust its slider. Higher values blank less.
My panadapters look different from each other
Display settings belong to the panadapter you opened them from.
- Open Display on the pan that looks right.
- Click Clone to all Pans under SYSTEM.
A slice has disappeared off the edge of the display
The slice is outside the visible span.
- Click the off-screen indicator at the edge of the spectrum. The slice becomes active and comes into view.
- To keep a pan on one slice as it tunes, right-click and choose Center Lock.
A floating panadapter won't restore properly
The saved floating-window layout could not be put back as it was.
- Turn on View → Workspace Canvas → Enabled.
- Choose View → Workspace Canvas → Workspaces → Import pop-outs onto canvas. See Workspace Canvas.