VFO Widget
Every slice has a VFO widget (the "flag") floating on the spectrum next to its frequency marker. It shows the frequency and a signal meter, and its tabs give quick access to the slice's audio, DSP, mode, RIT/XIT and DAX settings.
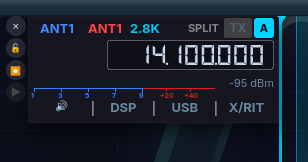
The VFO flag for slice A, with its close, lock and record buttons on the left edge.
Using the VFO flag
Frequency display
- Shows the slice frequency in
MM.KKK.HHHformat. - Double-click to type a frequency directly. Accepts
14.225(MHz),14225(kHz),14225000(Hz) or14.225.000(dotted). - On XVTR bands:
1446= 144.6 MHz (the decimal goes after the third digit). - Click the slice letter badge to collapse the flag to a compact label; click the collapsed label to expand it again. Right-click → Add Spot works in both forms.
Meter
Below the frequency is the signal meter. Click it to choose between the classic S-Meter bar and SmartMTR, which adds min/max extremes markers, numeric values and a transmit meter (Mic Level, SWR, Power or Compression). The choice applies to every flag. Full details are on Meters.
Slice buttons
Beside the flag:
- ✕ — close the slice
- 🔓 / 🔒 — lock the frequency (prevents tuning; a "LOCKED" notice appears if you try)
- ⏺ — record slice audio (pulses red while recording)
- ▶ — play the recording (enabled once one exists)
Record & Play
Where recordings are made is set in Settings → Radio Setup... → Audio → Recording:
- Client Side (the default) records on this computer, including AetherSDR's CW sidetone.
- Radio Side records in the radio (FlexRadio). On radios without a recorder, Radio Side is dimmed with the reason, and REC/PLAY record on this computer instead.
To transmit a radio-side recording as a voice keyer, press MOX first, then ▶.
Badges
- TX — red when this slice is the transmit slice; grey otherwise. Click a grey TX badge to move transmit to this slice.
- SPLIT / SWAP — split operation. Click SPLIT to create a transmit slice; on the transmit slice the badge reads SWAP. Right-click for the split menu. See Split Operation.
- ⇄ — this slice is linked to another with Link Slice. See Multi-Slice Operation.
Filter widen and narrow shortcuts
The Filter Widen / Filter Narrow actions (keyboard, MIDI or controller) change the filter width by 100 Hz in the right direction for the mode: USB, CWU, DIGU and RTTY move the upper edge; LSB, CWL and DIGL move the lower edge. See Keyboard Shortcuts.
Reference
Tabs
Click a label along the bottom of the flag to open its tab. Controls the slice's radio cannot use are dimmed, with the reason in the tooltip.
🔊 Audio
- AF slider with mute
- Pan (left/right) with a centre marker
- SQL — squelch on/off and level
- AGC-T — AGC mode (Off / Slow / Med / Fast) and threshold
DSP
The radio's own noise-reduction and filter toggles for the current mode, with level sliders where they apply: NR, NB, ANF, NRL, NRS, RNN, NRF, ANFL, ANFT, plus APF in CW and MN (manual notch) on radios that have it. Right-click a button for a quick parameter popup.
The same tab has the AetherRX and AetherTX launchers, always the same width, which open AetherSDR's own receive and transmit audio chains. The client-side noise reduction methods (NR2, RN2, NR4, NNR, DFNR, BNR, MNR) live in AetherRX, not on this tab; see Aetherial Audio and DSP Noise Mitigation.
The DSP tab label is colour-coded: green when any radio DSP or client noise reduction is active, grey when everything is off, cyan while the tab is open.
On FM, NFM, DFM and DSTR the tab becomes OPT (repeater offset and direction, simplex and reverse; CTCSS tones on FM, NFM and DFM only).
Mode tab
Labelled with the current mode (for example USB):
- mode selector and quick mode buttons;
- per-mode filter preset grid;
- Marker: button that cycles this slice's frequency marker Off → 1 px → 3 px, and a filter-edge toggle. These override the defaults set in View → VFO Marker Size (Off / 1 px / 3 px, default 3 px) and View → VFO Filter Edge (Show / Hide, default Show). Changing a View default updates every flag without overwriting a per-slice choice.
Adaptive RX filter (USB and LSB)
Under the filter presets in USB and LSB, Adaptive RX filter automatically fits the receive passband to the width of the signal you are hearing.
| Control | Choices |
|---|---|
| Adaptive RX filter | On / off |
| Lo cut / Hi cut | The limits the fit may use |
| SNR | Sensitive, Normal (default), Strong |
| Speed | Fast, Normal (default), Slow |
| Splat | Tight, Normal (default), Wide — splatter rejection |
| Het | Off (default) / On — narrows away from a strong heterodyne at the passband edge |
While a fit is applied, the filter readout shows AUTO. Adaptive fitting pauses while you transmit.
X/RIT
- RIT on/off, zero, step buttons and Hz readout
- XIT on/off, zero, step buttons and Hz readout
DAX
- DAX Ch — Off, or a DAX audio channel. The list follows the radio's capacity (up to 8 channels).
DAX IQ channels and the WFM satellite-data demodulator are in the panadapter's overlay DAX flyout, not on the flag. See DAX Virtual Audio and DAX IQ Streaming.
Known issues
- With Client Side recording, the slice recording stops capturing audio when you transmit, so your own transmission is not recorded (#4141).
Troubleshooting
Tuning does nothing and a "LOCKED" notice appears
The slice's frequency is locked.
- Click the 🔒 button beside the flag to unlock it.
A control on the flag is dimmed
The slice's radio can't use that control.
- Hover over the control; the tooltip gives the reason.
The filter readout says AUTO
Adaptive RX filter is on and is fitting the passband to the signal (USB and LSB only).
- Open the mode tab (labelled with the current mode).
- Turn Adaptive RX filter off to set the filter yourself.
▶ (play) is greyed out
There is no recording for this slice yet.
- Click ⏺ to record, then click it again to stop. ▶ is enabled once a recording exists.
The flag is a small label with no controls
The flag is collapsed.
- Click the collapsed label to expand it again.